
Outline:
- Decide which instrument you are going to use
- Enter sample information into IconWeb before going to the NMR facility
- Go to the NMR lab to place your sample(s) into the changer and retrieve completed samples.
- Submit your experiment(s) in IconWeb
COVID-19 Safety requirements:
Use of the facility is no longer subject to facility-specific COVID-19 rules. Please follow University policy or your group’s policy, whichever is more constrictive, while in the facility. As a courtesy to other users, please wash or sanitize your hands before touching shared objects.
Detailed Instructions:
Before leaving your lab:
- When your sample is ready:
- Decide which spectrometer to use
- Enter the sample information into the queue using the IconWeb interface
NOTE: Entering sample information before your sample is ready is a violation of facility rules.
In the NMR rooms:
- As a courtesy to other users, please wash or sanitize your hands before touching shared objects.
- Make sure you are in the correct room!
Putting your sample in the wrong changer will mess up both your experiment and will potentially mislead the other person whose sample you replaced with yours.- AV400 is in B-73, across the hallway from the S.T. Olin elevators
- AV500 is in B-63, at the bottom of the ramp to Baker
- AV501 is in B-69, across the hallway from the drinking fountain
- Go to the sample table. The AV400 & AV501 sample tables are to your left as you enter the room. The AV500 sample table is past the computer table and the electronics cabinet.
- Sample tubes must be positioned in “spinners” before placing them into the sample changer. There are four types of spinners in use in the facility:
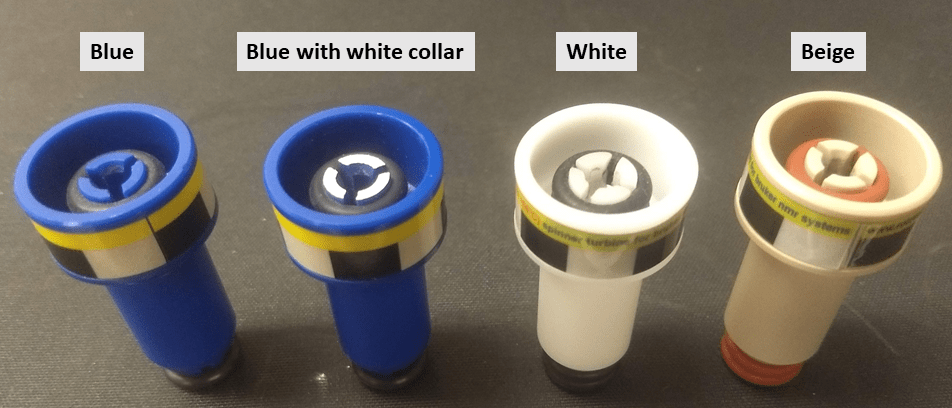
- Blue spinners WITHOUT white collar: Use ONLY at or near 298 K (25°C) and do NOT use in the AV400 (Room B-73)! You will get a “sample missing” error message. Please do NOT bring these spinners to B-73.
- Blue spinners WITH white collar: Can be used in all three instruments but ONLY at or near 298 K (25°C).
- White spinners: Use in any Bruker for 253 to 333 K (-20 to +60°C) temperature range, including at or near 298 K
- Beige spinners: Used EXCLUSIVELY for high-temperature experiments. Do NOT use a beige spinner to run samples at ambient temperatures. They work on all Bruker spectrometers and you may move spinners between labs.
- Insert your sample(s) into spinner(s) and set the tube to the correct depth using the depth gauge:
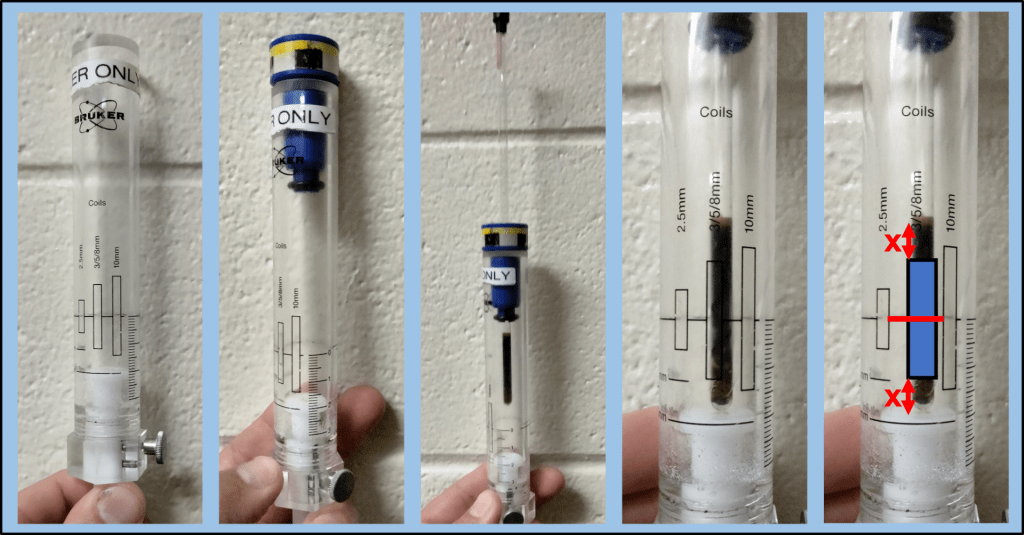
On the AV500 ONLY, you can also use the rack on the sample table:
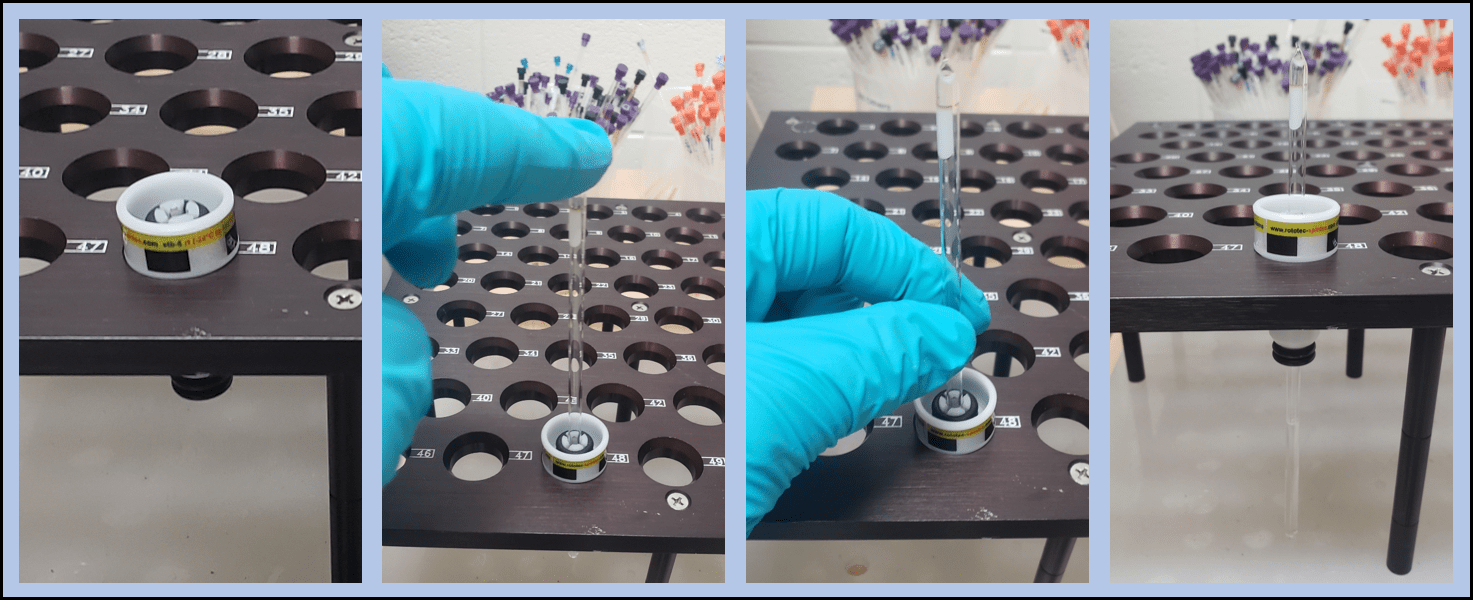
- Place a spinner with the narrower part down into the depth gauge (all instruments) or any open position (hole) in the black-topped rack on the sample table (AV500 only).
- Insert the sample tube into the opening at the center of the spinner.
- Gently push the sample tube straight down until it makes contact with the base of the depth gauge or rack. Use the tip of a finger or pinch the tube between your thumb and index finger. In order to minimize the severity of your injury when the tube breaks, do NOT push with your palm.
- You should feel resistance when you push in your tube. If the tube slides in too easily, it could move when it is inserted into and removed from the magnet, which could result in the changer breaking your tube. If in doubt, find a tighter spinner.
- The recommended sample height is 40-50 mm for all instruments. The minimum sample height is 36 mm for the AV500 and AV501, and 30 mm for the AV400. There are signs on each lab door where you can confirm your sample is the correct height. NEVER use a sample below the minimum height requirement.
- If your sample is shorter than 40 mm, you MUST center it around the black box labelled “3/5/8 mm” on the spinner.
- Once the sample depth has been set, do NOT move the tube inside the spinner. If you accidently move the tube, readjust the depth in the gauge or rack. Warning: Tubes positioned too low in the spinner WILL break inside the sample changer and may result in broken glass inside the probe. Broken glass inside the probe may cause catastrophic probe damage.
- Leave your samples on the table for now.
- Double check that you are in the correct room, then climb up the platform ladder and remove any samples from the holders you signed up for.
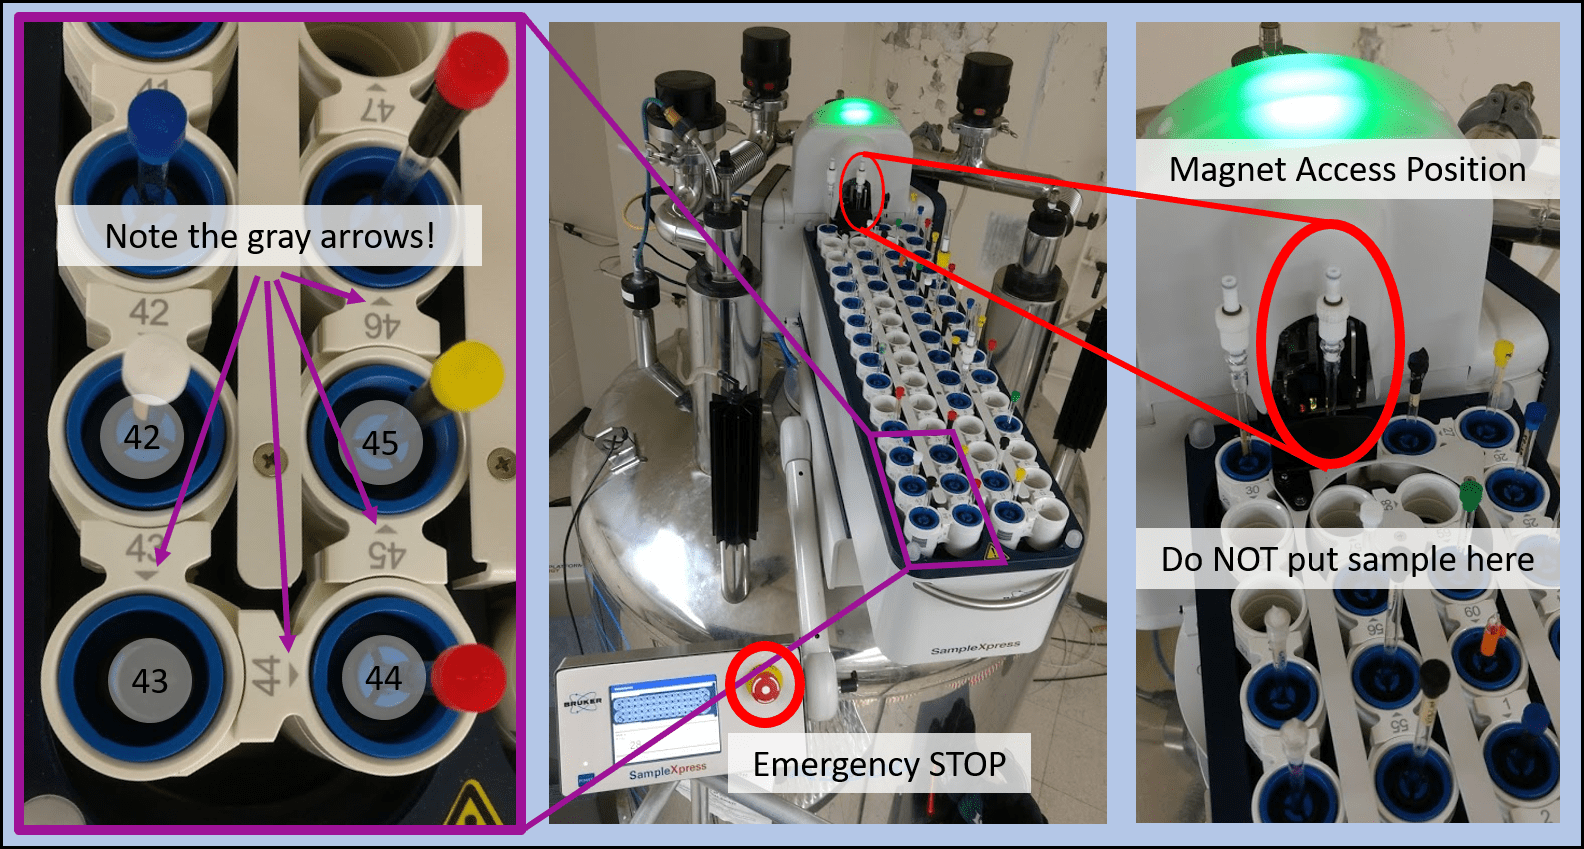
- Note the color of the light on top of the sample changer:
- Green means the changer is idle. You may remove and add samples.
- White means the changer is busy. WAIT until light turns green before removing or adding samples. The carousel could move at any time potentially breaking sample tubes.
- Red indicates and error. You may remove and add samples but please notify us immediately! During business hours, come find us. Outside business hours, or if you can’t find us, we prefer a video call in Teams from your mobile device so we can easily see what’s going on. You may be able to help us reset the changer. Alternatively, you can call the numbers listed on the doors, or start a Zoom meeting on your phone and text us a link.
- Double check the holder numbers before removing the tubes. Note the small gray arrows that point to the holder corresponding to the number printed on the sample changer.
If you accidently remove an incorrect tube, contact us immediately. - NEVER put a sample directly into the magnet access position (see image above). It will interfere with the sample that is inside the magnet and disable the sample changer.
- Remove the tube(s) from the spinner(s) and sort them into the appropriate beakers on the sample table based on the color of the cap. Please do NOT leave samples in spinners in the rack.
- Note the color of the light on top of the sample changer:
- Place your samples into the changer. Make sure you use the positions you signed up for!
- If you break a sample or notice a broken sample inside the sample changer PRESS THE RED EMERGENCY STOP BUTTON on the changer’s control panel IMMEDIATELY and contact us. Warning: Broken glass inside the probe may cause catastrophic probe damage.
- When you are done, go to IconWeb and submit the samples to the queue. You can do this from a mobile device.
- Please, PLEASE, PLEASE take your samples back to your lab when they are done. The sorting beakers are overflowing with tubes.
Go to the computer stuff, go back to using IconWeb or return to the main NMR training page.