
Entering sample information into the automation queue before going to the lab to load samples:
- You can connect to the computers from campus WiFi (EduRoam or RedRover)
- If you are not connected to campus WiFi, connect to the university-wide Cornell VPN (Cisco AnyConnect). Click here for instructions.
NOTE: You may be unable to connect from departmental VPNs. - Enter the IconWeb address in the address bar of a browser of your choice:
- AV400 is at https://av400.nmr.chem.cornell.edu
- AV500 is at https://av500.nmr.chem.cornell.edu
- AV501 is at https://av501.nmr.chem.cornell.edu
- If you can’t connect:
- If you are not on campus, confirm that you are connected to Cornell-wide (not departmental) VPN
- Including the https:// part may be required depending on your browser
- Mac users: try Firefox if Safari or Chrome fail to connect
- You will get a security warning that “Your connection is not private” or there is a “Potential Security Risk Ahead”, depending on the browser you are using. The specific error code listed should be related to the certificate being self-signed.
- Click the “Advanced” button.
- Click the link or button that allows you to proceed to the “unsafe” page. In this specific case, we know the connection is actually safe. Do NOT do this with other sites.
- Log in with the username “cornell\NetID” and your NetID password.
Note: the “cornell\” part is required. The slanted line is a backslash “\” not a forward slash “/”. Capitalization does not matter. - You will now see the main IconWeb window:
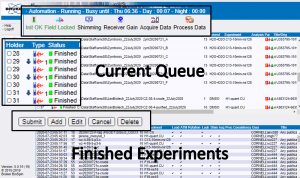
- At the top of the page you can see status information about what the instrument is doing.
The Busy until time is a good indication of when your day samples would start if you submitted them now.
Do NOT trust the Day value, especially on the av400, because it is simply the sum of all experiments submitted to the day queue and does not include the 6-minute overhead time required to switch samples. If there are 10 samples ahead of you, the Day value will be off by an hour.
The Night value can be used to estimate whether your experiments will finish by next morning, but keep in mind that if there are a lot of day samples, night experiments may start later than 8 pm. - The upper half of the screen shows a table, which represents the current queue.
The holder numbers in the left column correspond to positions in the sample changer.
Make sure the holder is empty or its status is “Finished” before interacting with it. - The queue interaction buttons are located below the table.
To interact with the queue, select a holder and click the appropriate button. - The bottom of the page shows the history of all experiments run from the current setup file.
You can use this to check if there were any errors associated with your finished experiments.
- At the top of the page you can see status information about what the instrument is doing.
- Select a holder that is empty or contains a “Finished” experiment.
Do NOT use holders that contain sample information and are labelled “Queued” or “Available”. A holder may have multiple lines associated with it. Make sure ALL lines say “Finished” before adding your experiment. - If the holder status is “Finished,” delete the previous user’s experiment before setting yours up:
- Select the lines containing the “Finished” experiments.
- Click the “Delete” queue interaction button.
- Click “Add” and a new window will open.
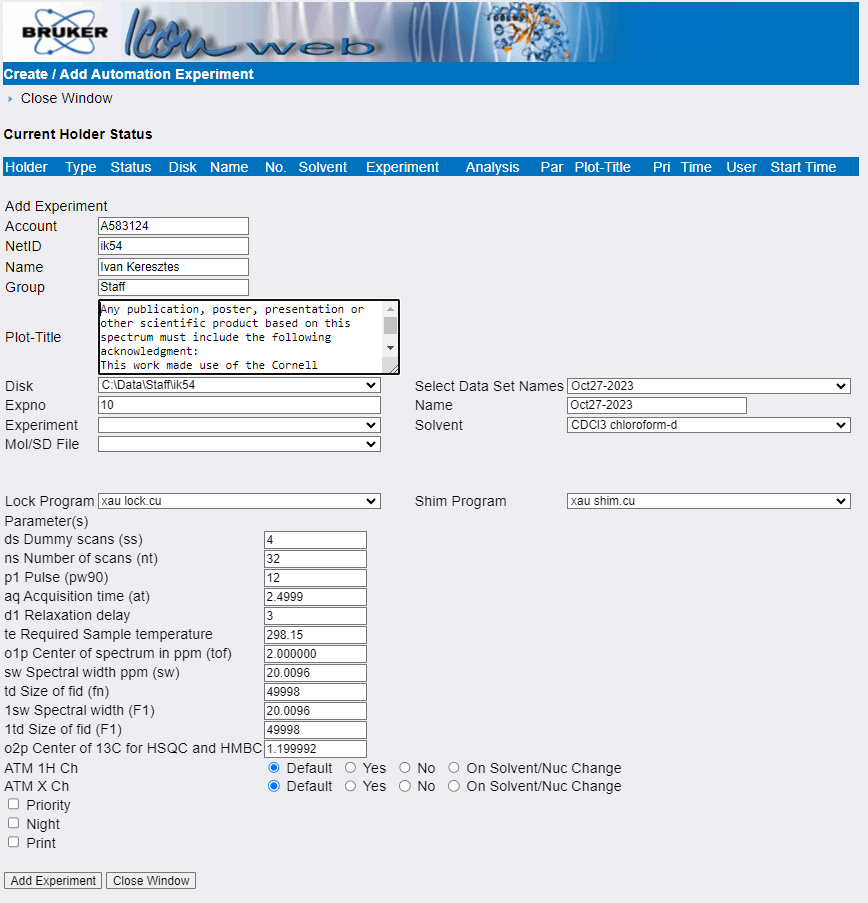
- Enter the sample information:
- Account should be a valid, non-expired account that we can use to bill you for the experiment. If the default value is incorrect, you can override it manually. If you want to change the default value, please let us know.
- NetID, Name, Group If any of these values are incorrect, you can override them manually, but please let us know so we can update your account.
- Plot-Title is a freely editable text field that MNova will import when you open the file for processing.
Please acknowledge the grant listed in the default title text in any scientific product that made use of the NMR facility. - Disk should be c:\Data\Group\NetID. If that is not the case,
please let us know and we will fix it. - EXPNO (short for Experiment Number) is an integer that will be the name of the subfolder that stores
this particular experiment within a dataset. This allows you to run unlimited number of experiments
under the same dataset name as long as they have unique EXPNOs. You can let the software set it for you or change it if you prefer.
Some users like to set the EXPNO to match the nucleus of the experiment: 1 for 1H, 13 for 13C etc. - Select the Experiment you want to run from the drop down list. The most commonly used experiments are:
- H1-quant: 1H in fully deuterated solvents. Gives excellent sensitivity and accurate integration for most samples.
- H1.CU mimics the standard settings on Varian spectrometers for backward compatibility and is not recommended for new users.
- WATERSUP: 1H in H2O/D2O mixtures. Will suppress the water signal but may also wipe out analyte signals close to the water chemical shift. If your sample is in H2O only, use H1-WET-1F instead of WATERSUP.
- H1-WET-1F: 1H with single frequency signal suppression. Used for acquiring spectra in non-deuterated solvents with a single resonance (CHCl3, CH2Cl2, etc.) or for samples in deuterated solvents that contain a single intense, unwanted signal.
- H1-WET-2F: 1H with two frequency signal suppression. Used for acquiring spectra in non-deuterated solvents with a two resonances (THF, MeOH etc.) or for samples in deuterated solvents that contain two intense, unwanted signals.
- 2D gCOSY: 2D experiment that connects coupled protons. It’s very quick (4.5 minutes) and robust, and can help you trace networks of neighboring hydrogens. We highly recommend running one for every new compound.
- 2D HSQC: 2D experiment that connects hydrogens with the carbons they are attached to. It’s more sensitive than a 1D carbon and provides multiplicity information like a DEPT135. It takes about 5 minutes and should work for most samples with 1+ mg analyte. Please note that you will not see quaternary carbons as well as a few others, like terminal alkynes. Ask us if you have questions.
- 2D HMBC: 2D experiment that connects hydrogens with neighboring carbons. It’s more sensitive than a 1D carbon and will detect quaternary carbons if they are within three or possibly 4 bonds of a hydrogen. Try it out and we’ll help you with the analysis.
- C13-10min-ns128: Standard 13C experiment that should always be tried first before longer ones.
This 10 minute experiment on the cryoprobe is equivalent to a 90 minute carbon on a traditional probe and should give publication quality data on 5+ mg of small molecule analytes. - C13-1hr and C13-4hr: Longer 13C experiments that should be run only if a 10 minute experiment did not give satisfactory data. They MUST be submitted as night experiments. Do NOT submit them into the day queue without staff permission.
- P31-10min & P31-1Hcoup are proton decoupled and coupled 31P experiments. We strongly recommend running both for all samples containing phosphorus.
- F19 spectra acquired on the cryoprobe (AV500) contain strong probe background signals. If the 19F chemical shift of the analyte is known we suggest restricting the spectral window by changing the spectral width and center in the parameter list below.
- If you would like to observe a nucleus that doesn’t show up on the list, contact us and we will add it if possible.
- Select Data Set Names allows you to insert the current date into the Name field below using a variety of formats
- Name is the dataset name, which is the parent folder that will contain the EXPNO subfolder(s) that store the experiments. Name your datasets according to your group’s specifications. If there is none, we recommend including your initials and sample identifiers such as notebook and page numbers. Do not use names like “starting material” or “yellow solid”. Do NOT use “/” or “\” anywhere in the name and do not end the name with a period (.) It crashes the software!
- Select your Solvent from the drop down list. Make sure you don’t confuse protonated and deuterated versions of the same solvent.
For H2O/D2O mixtures with D2O content below 30% select 10%D2O/H2O.
If your solvent is not in the list, select the solvent with the closest chemical shift or select “No Solvent”, which will disable locking and shimming. You should also let us know so we can add it to the list. - For most samples you can leave the Lock and Shim Programs at their default settings, even for proteo solvents. If you have a sample that you already know will fail to lock or shim, you can turn them off by selecting “Skip” from the drop-down list.
- You can adjust acquisition parameters in the boxes below:
- Dummy scans are scans where the instrument preforms the experiment but doesn’t save the data. They are used to establish a stable, steady-state initial magnetization prior to collecting data.
Typical values are 0-4 for 1D and 8-32 for 2D experiments. - Number of scans determines how many experiments will be averaged to give the final spectrum.
The total experiment time scales linearly with the number of scans and signal-to-noise ratio goes up as the square root of the number of scans. Remember not to exceed the 20-minute limit for day experiments if you increase the number of scans. - Pulse is the reference value for the duration of a 90 degree pulse. NEVER increase this value. There may be benefits to decreasing it for the observation of paramagnetic samples. Please contact us for details.
- Acquisition time is the length of the FID in seconds. Appropriate values vary from 3-5 s for 1H spectra for small molecules to 10 ms for quadrupolar metals such as 27Al. Changing the spectral width changes the acquisition time so note its value before making a change to the spectral width and reset it after. Please contact us if you would like to learn more.
- Relaxation Delay (along with the acquisition time) controls the delay between individual scans. It varies from minutes for quantitative 13C without relaxation agents to few ms for paramagnetic and quadrupolar samples. Contact us if you have questions about setting the relaxation delay for your particular sample.
- Adjust Center of spectrum in ppm and Spectral width ppm if you expect signals outside the normal window. You can calculate the new spectral width as [upper limit] – [lower limit], and the new center as [lower limit] + [spectral width]/2. For example, if you want to observe a 1H spectrum from -15 to 20 ppm set the spectral width to 20 – (-15) = 35 ppm and the center to -15 + 35/2 = 2.5 ppm. To observe 19F between -32 and -67 ppm, set the width to -32 – (-67) = 35 ppm and the center to -67 + 35/2 = 49.5 ppm. Remember to reset the acquisition time after changing the spectral width.
- Dummy scans are scans where the instrument preforms the experiment but doesn’t save the data. They are used to establish a stable, steady-state initial magnetization prior to collecting data.
- Do not change ATM settings.
- Click the Night button to submit your experiment into the night queue. All experiments over 20 minutes in duration MUST be submitted to the night queue unless you get approval. If you have more than 5 samples, put them in the night queue. If it can wait a day, consider submitting to the night queue.
- Scroll to the bottom of the page and click “Add experiment”
- You should now see a row at the top of the page showing details of the previously selected
experiment - Repeat steps 9-11 to add more experiments to the same sample
- When you have added all experiments, click “Close Window” at the top or bottom of the
page - Do NOT submit the experiments! You will do that after you have been to the lab and loaded the samples in the sample changer.
- Click the “Logoff” button in the top left corner of the page
Modifying a previous experiment
- Select the the line in the table with the experiment you want to modify
- If the experiment is “Queued”, click the “Cancel” button to remove it from the queue. Queued experiment can’t be modified.
- Click the “Edit” button to open a new window with experimental details
- Make your changes and click the “Save Edits” button at the bottom of the page
After leaving the lab:
- Connect to IconWeb following steps 1-6 above
- Find the holders you loaded samples into
- Select the topmost line associated with the holder and click “Submit”
- Scroll to the right in the queue frame to see the approximate start time
for your experiments - Click the “Logoff” button in the top left corner of the page
Go to changer instructions, go back to changer rules or return to the main NMR training page.